|
Introduction Here you will find a description of the process of making different styles(filters) for WinAmp Skin Creator. It is simple, all you need is some skill in using any graphic editor.
A little bit of theoretical information to start. WinAmp Skin Creator is based on Styles technology - a packet of filters, which are applied to the main picture. On the illustration you can see the system of the filters superposition.
Now lets talk about colours. Filters 1,3 (4,5,6, etc if exist) are used to apply some effects on the original picture. For example if we darken some areas on the picture, and lighten others, we obtain a relief picture. How to make an embossed button? First of all we need to create a new file of the needed size (you can see the sizes in Default style or just edit those files, previously copied into another folder). Next:
You probably guessed already thet if the BLUE colour is lighter than R:0 G:0 B:127 then the picture in this place will become lighter, and if the colour is darker than R:0 G:0 B:127 - than the picture also become darker. Other colours act similar - where they are painted, there the alteration of the original picture takes place. This is a table of the employed colours with the description of their effects.
Thus it is possible to draw any control element(button, scroll bar, etc.) Examples can be taken from \Styles\Default\ . If you have any questions, you can always ask them by e-mail adress dimonius@dimonius.ru,
or with the ICQ - 11152101. After creating a style, it will be very kind of you to send it to me - just click on "Send My Style" button in the program's main page.
|
||||||||||||||||||||||||||
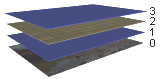 Filter 1 (number one on the illustration) applying on the original picture (layer 0). It can lighten the parts of the picture, darken, insert some parts from filter 2 (see illustration 2) and fill picture's segments with different colours.
It is possible since different colours were used in those filters. Filters, similar to filter 1, are then applyied to the image. Filter 2 is just a normal picture.
Filter 1 (number one on the illustration) applying on the original picture (layer 0). It can lighten the parts of the picture, darken, insert some parts from filter 2 (see illustration 2) and fill picture's segments with different colours.
It is possible since different colours were used in those filters. Filters, similar to filter 1, are then applyied to the image. Filter 2 is just a normal picture.